Leading manufacturer and supplier of ready mix concrete, liquid screed and concrete pumps for the South West
  • Removes the need to have the floor sealed prior to laying
  • Gains strength quicker than anhydrite
  • Can be used in wet areas
  • Request a quote

Liquid Screed

Wrightflow liquid screed


Thanks to our extensive knowledge and experience in the industry, we have developed our own Wrightflow liquid screed which has been rigorously tested and designed to work to the greatest effect when combined with underfloor heating. Not only do we supply the liquid screed for your project, our experts will install it for you too to ensure a smooth, hassle-free delivery.

Concrete liquid screed is the perfect way to get the most out of your underfloor heating system, as the flowability of liquid screed means that it encloses pipework completely, eliminating air bubbles and gaps to ensure improved heat conductivity throughout your floor. This will contribute towards the energy-saving properties of your property and could save you money on your heating bills!

Even if you don’t have underfloor heating, liquid screed is an excellent choice for internal flooring when compared with more traditional methods, as it is self-levelling and quicker to dry than other sand and cement screeds. You are usually able to walk on your new floor within 24-48 hours.

Are you interested in liquid screed flooring for your commercial or DIY project? Contact us on 0117 958 2090 for a free, no obligation quote or fill out the quick contact form on this page.

What is our liquid screed made of?


Our liquid screed is designed to withstand not only the most testing of conditions but also to achieve outstanding results. Our Wrightflow screed consists of blended cement, sand, limestone, dust and water. 

We have also included admixtures such as anti-crack fibres and anti-shrink agent to improve the strength and resistance of our liquid screed against deformation and a super plasticiser for the best workability.

Wright MiniMix Wrightflow Screed

Wright MiniMix - Wrightflow Screed

Do you need Liquid Screed?


Liquid screed is rapidly overtaking other traditional screeds as the go-to choice for internal concrete flooring, and for good reason. Liquid screed is practically self-levelling, resulting in a completely smooth and even flooring finish and is more resistant to cracking and shrinkage.

If you have underfloor heating, then there really is no better choice; air pockets are the worst for heat conductivity, and using a liquid option is the only way to eliminate these completely, ensuring that heat is distributed evenly throughout your floor.

Our liquid screed can tolerate light traffic after just 24-48 hours, making it perfect for those time restricted projects. Contact us on 0117 958 2090 to find out more.

What are the benefits of liquid screed?

 
  • Eliminates the need to seal the floor prior to laying the latex
  • Improves the performance of your underfloor heating system
  • Reduced risk of cracking, curling and shrinkage
  • Self-levelling for a smooth even finish
  • Faster installation and drying times

liquid screed flooring

Liquid Screed FAQs


Our self-developed Wrightflow screed is a cement based, self-compacting and virtually self-levelling liquid screed which can be used for any internal floor.

Wrightflow screed is easy to pour and its liquid properties make for quick drying and installation. It’s especially effective when combined with underfloor heating systems, as it eliminates air pockets and therefore increases conductivity. This guarantees quick and even heat supply across the floor and makes your building more thermal efficient, saving you money.

Wrightflow screed is only suitable for use on internal floors.

Yes, as the advantages of Wrightflow liquid screed are not limited to its energy efficiency and are intended for use in all aspects of construction. The use of our liquid screed eliminates the need to seal the floor prior to laying latex, adhesive or any other cement-based product. It can also be used in wet as well as dry internal areas without degrading the screed quality.

This answer is different depending on whether the floor is bonded, unbonded, floating (commercial or domestic) or with underfloor heating. To find the solution to your particular requirements, a member of our expert team would be happy to help you.

Our Wrightflow liquid screed is offered with a pump and floor layer as a package deal. Our specialist contractor will ensure the screed is laid correctly, which relieves you of the pressures and stress of installation.

Our office is open 8.30am to 5pm, though a representative is on call and available to talk to customers at all times.

Mon – Fri: deliveries 7.30am – 4.30pm. Collections from 9am onwards. Saturday Deliveries 7.30am – 10.30am. Collections: 8.30am – 10am.

Yes - we require that you or an appointed representative is present at the delivery site to sign the delivery ticket as proof of delivery.

Our varied fleet of delivery vehicles all share a width of 3m (9ft), with differing lengths. We have trucks available which are shorter in length to help with reaching those difficult to access sites. We will visit your site beforehand in order to choose the best option and our included pumping services ensure that nowhere is out of reach.

We endeavour to meet all delivery requirements promptly and without delay. Please contact our team to discuss your delivery requirements.

Between 24-48 hours is expected before you can walk on our Wrightflow screed. Cure time will depend on the thickness, type of screed being used and the atmosphere of the room it is being placed, though it is typically 1mm per day up to 40mm. We can give you a clearer answer once we know the details of your project, so please contact us to discuss the details of your screed requirements.

Shrinkage and cracking in both concrete and screed is common and caused because cement products shrink when they dry as the excess water is released from the product. This can be exacerbated by wind and sun across the surface. The initial forced drying / water release can be reduced by correct curing and to this end we spray a curing agent across the surface when we have finished laying the floor but still cracking commonly occurs where there is a restraint i.e. doorway, re-entrant corner, corner, or even when the slab is too long with no expansion joints. This can also be exacerbated by forced drying especially if underfloor heating is turned on too early and too forcefully.

We do our utmost to reduce the risk in the product by including an anti-shrink agent, super plasticiser (to reduce the water), polypropylene fibres and limestone filler but still we cannot guarantee that cracking will not occur. Environmental and restraint factors are difficult to anticipate and correct for in advance.

Our Wrightflow liquid screed is guaranteed to save you money if you have underfloor heating, as the screed annihilates air pockets and increased conductivity throughout the floor. This guarantees quick and even heat supply and helps contribute towards the energy saving of the building.

Please read our Wrightflow brochure and laying guidance for information on what you need to do to prepare for laying our screed. For further enquiries, do not hesitate to ask us. Our team is happy to help.

Do you have any screed requirements? Why not contact us to find out more about the liquid screed that we supply.
We are the right people for you – let’s work together! Contact us on 0117 958 2090 today to get a quote or to find out more.

News
How to Test for Concrete Slump
16th November 2022

A concrete slump test is a method of measuring the consistency of fresh concrete. It’s a simple and easy way to check the workability of multiple batches before they set.

Wright Minimix are industry-leading concrete specialists, supplying ready-mix concrete and liquid screed across the South West. In this post, we explain what a slump test is, why it’s necessary, and how to carry one out.

What is a concrete slump test?

A concrete slump test is a routine procedure for seeing how easily a batch of concrete will flow. It’s low cost, easy to carry out, and produces immediate results.

Why perform a concrete slump test?

Before laying concrete, it’s important to check all batches have the same consistency. This ensures a constant quality and strength throughout. A slump test reveals the water-cement ratio, letting you know whether more or less cement needs to be added to the mix.

Too much water will weaken a mix. If you require a higher workability, you must raise the amount of cement within the mix.

What is the method for carrying out a concrete slump test?

To carry out a concrete slump test, you’ll need a slump cone, a measuring stick, a steel rod, and - of course - the concrete itself. Follow the steps below to find out the slump result of your concrete:

  1. Place the slump cone on a flat surface and stand on the footholds either side.
  2. Pour a layer of concrete into the cone, and use the steel rod in a circular fashion to smooth and compact it around 25 times. Make sure to penetrate the previous layer by about an inch. Repeat this with another layer of concrete on top.
  3. Pour in one final layer and rod it 25 times. The rod should penetrate the second layer, but not go through it fully. If the concrete is compacted beneath the top of the mould, stop rodding and add more concrete, then continue.
  4. After pouring the layers, clear away any overflow from the top and base of the cone. Double check the concrete reaches the top level of the cone.
  5. Slowly lift the cone up, shaking it gently until it is free of the concrete. Place the cone upside down next to the concrete, which will soon start to slump.
  6. Lay the steel rod across the top of the upturned cone so it hangs over the concrete.
  7. Measure the distance from the rod to the top of the slump. The level of slump is measured to the nearest 1/4 of an inch. The recorded results are the slump of the concrete.

Talk to the South’s concrete specialists

Wright Minimix have been delivering premium concrete solutions for over two decades. Whether you’re in need of ready-mix concrete, concrete blocks, or a heavy-duty concrete pump, we’ll be there to provide it on time and on budget.

Get a quote online or by calling our friendly team on 0117 958 2090.

Read more
The Complete Guide to Concrete Footings
07th September 2022

Whether a house, deck, or bridge, every structure needs a strong footing to stand on. 

Concrete footing lies at the very lowest point of a foundation. Responsible for supporting the weight of an entire building, the footing must be strong, durable, and sturdy enough to last years under heavy strain. 

Poorly built concrete footing risks cracking or sinking into the ground. In extreme cases, it can even cause the building to collapse altogether! 

For these reasons, laying out concrete footing correctly is a crucial part of the construction process. 

Wright Minimix are specialists in all things concrete. We have extensive knowledge about using concrete for a variety of applications, and have years of experience working on projects across the south west. 

In our guide to concrete footings, we cover everything you need to know about correctly laying a footing, from determining the right concrete mix to proper site preparation. 


What are Concrete Footings? 


Footings are the solid concrete at the very bottom of a structure. They distribute the weight of a building across an area, preventing it from sinking into the ground. 

Footings are usually the first thing you build when starting a new construction project. Because they need to support a significant amount of weight, footings must be made of very strong concrete. It should be at least 3500 psi (pounds per square inch). 

There are several different types of concrete footings: footing under a single column, footing under multiple columns, and wall footings. 

Concrete has high compressive strength, meaning it can withstand heavy loads without fracturing, but low tensile strength. This means too much weight can cause it to elongate. For this reason, the concrete mix is usually reinforced with horizontal and vertical rebars. 


What is the Best Concrete Mix for Footings? 


The mix you use is one of the biggest factors in determining how strong your concrete footing will be. 

Much of this revolves around the aggregate (the stone and sand used in the mix), as the aggregate is what gives concrete its strength. It makes up the bulk of the concrete and adds to its overall compressive strength. More stone means a stronger mix. 

However, using overly coarse or oversized aggregates can cause “honeycombing.” Honeycombing refers to the gaps in the concrete caused by large pieces of aggregate sitting against the rebar, creating an effect that visually resembles a honeycomb. Honeycombing can be fixed by adding finer aggregates and more concrete to the mix, and by mixing the concrete more thoroughly. 

For concrete footings, the best mix to use is: 

  • 1 part cement 
  • 2 parts sand 
  • 4 parts stone (aggregate by volume) 


What aggregate size should you use for concrete footings?

The aggregate should be around 1/2 – 1 inch in size. After 28 days of curing, this mix will yield a 3500 psi. 


Ready Mix Concrete for Concrete Footings

Although you can mix the concrete yourself, the most time and cost-effective way is to buy a ready mix. With ready-mix concrete, you can skip the laborious process of measuring and mixing and get straight to pouring. 

At Wright Minimix, we create ready-mix concrete to your exact specifications. Because each mix is custom made, there is little or no wastage. There is also no need to have a labourer mix the cement on site, nor do you need to make space for storage. 


How Do You Lay Concrete Footings? 


The exact method will depend on the structure’s size, shape, and location. It’s also important to note that laying a footing is a complex process that requires significant expertise. Make sure you’re working with experienced professionals who can carry out the process correctly. 

With that in mind, here is an overview of the general process: 


1. Prepare the Site 

Before you do anything, it’s important to analyse the condition of the soil on site. The size and dimension of your footing depends on the soil’s load bearing capacity. Soft or troublesome soil requires special care, as there is a high risk of the concrete sinking into it. 

You should also clear out grass, roots, and debris from the idea, and identify the layout and corners of your foundation so it can be structured correctly. 


2. Dig the Trench 

Once you’ve determined how wide and deep the trench should be, you can begin digging. 

The hole for your footings needs to be bigger than the foundation, so you and your workers have room to lay down the footings. There should be at least 2 feet on all sides. 

The perimeter hole should be at least 2 feet wide by 2 to 3 feet deep. Make sure to clear out any remaining dirt and plantation afterwards. 
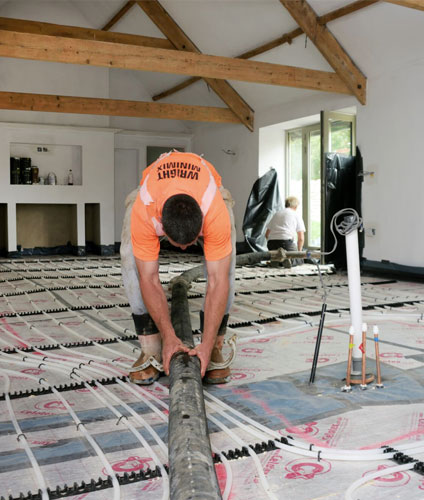
 

3. Set the Rebar 

Rebar support beams prevent the concrete from cracking or crumbling. You should set your rebar in place, then attach the grade pins on top. Each grade pin should be about 2 feet apart from one another, and a foot away from the corners. 

Make sure that the rebar is an equal distance from the sides as it is from the base of your opening. 


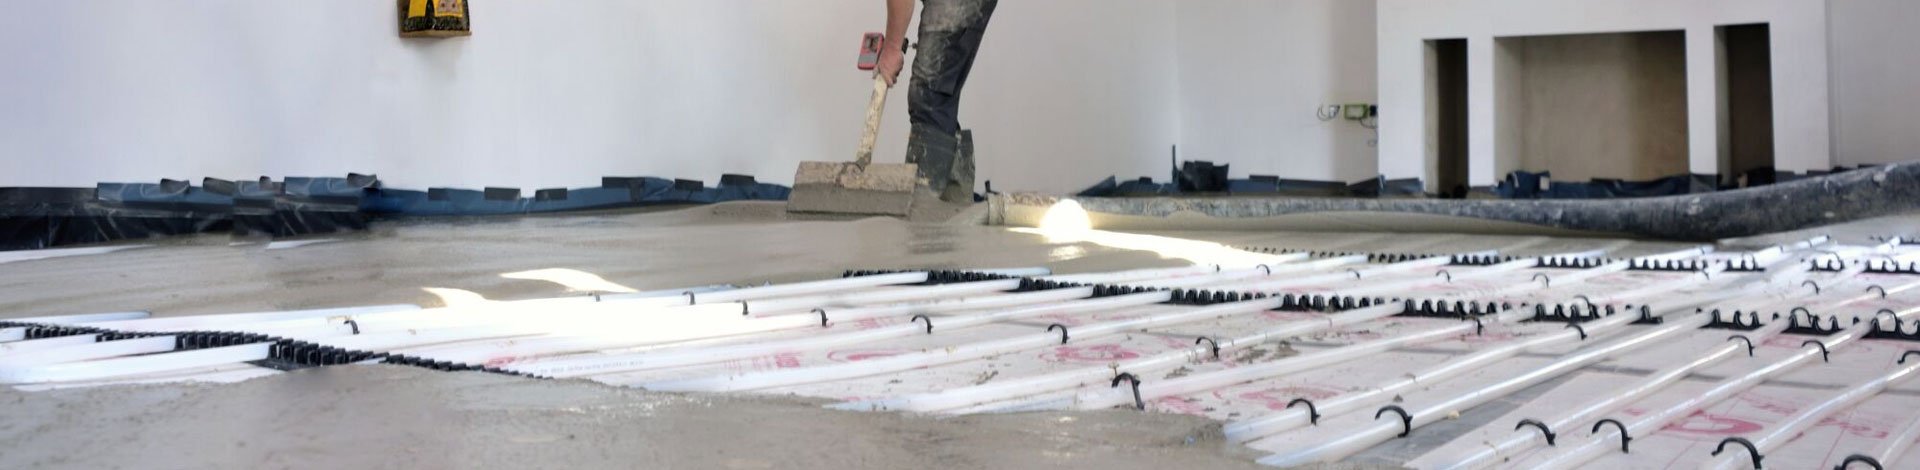
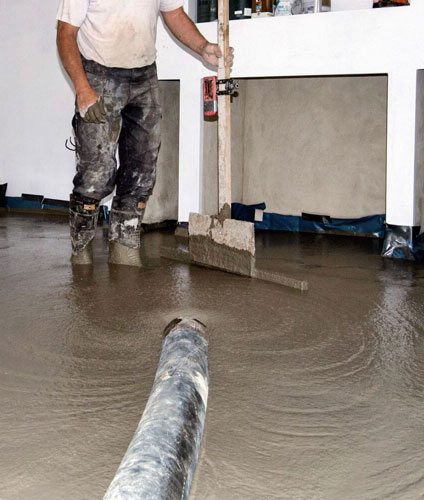
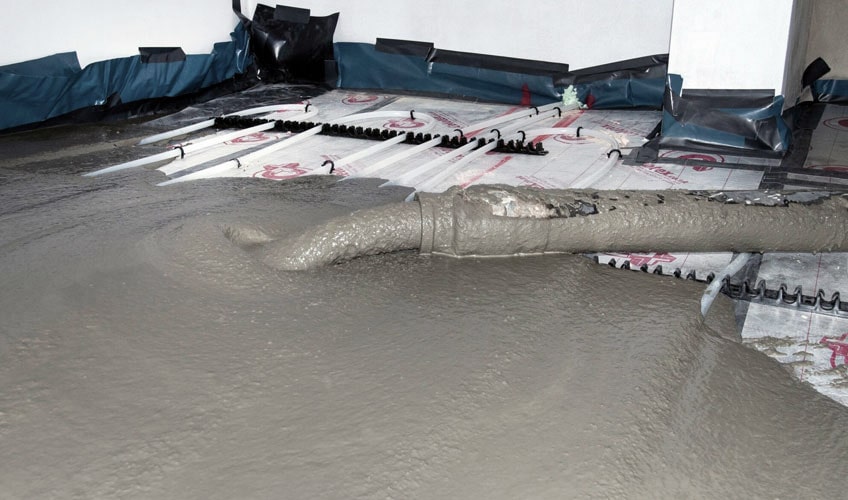
4. Mix and Pour the Concrete 

If you’re using a ready mix, you can skip straight the pouring. Depending on the size and location of your site, a concrete pump may be your best option for this. 

Wright Minimix has a fleet of concrete pumps available, big and small. This includes our compact Minipump, ideal for hard-to-access sites, as well as the largest concrete pump in the UK

If you’re preparing the concrete yourself, make sure the ratio of cement, aggregate, and water is correctly measured out before mixing. 

Once the concrete is prepared, pour it into the trench. This must be done within thirty minutes of mixing. 

The final step is to protect your footing from moisture and damage with an industrial-quality, acrylic-based sealer. 


Trust Wright Minimix for Your Concreting Needs

Need a reputable concrete supplier for your project? No matter what kind of structure you’re working on, we have the exact type of ready-mix concrete you need. Get in touch to arrange concrete for your footing today!

Read more
Bonded vs Unbonded Screed
01st September 2022

When it comes to any building, flooring is an essential part of its structure. This means it’s vital to ensure that your floors are sufficiently strong, durable, smooth and level. This can be achieved through screed flooring, but with all the different types available on the market today, you may be unsure as to what one best suits your building’s needs.

There are two main floor screed designs – bonded screed and unbonded screed. To give clarity, specialist concrete contractors Wright Minimix have developed this guide to explain what exactly screed is, the differences between bonded and unbonded screed along with the benefits and uses of each.

Read on to find out more, or contact us today to discuss a screed flooring quote.

What exactly is screed?

Screed is essentially a thin layer that is laid over concrete to create a smooth, sturdy and hardwearing subfloor. Created by mixing cement with graded aggregates and water, screed can be between 25mm and 100mm in thickness, and can be left as a standalone finish or covered with additional decoration (such as carpet or floorboards).

What is bonded screed? 

Bonded screed is laid onto a mechanically prepared substrate (or underlying layer) using a bonding agent or slurry.  The aim is to maximise the potential bond to the concrete substrate. The optimum thickness of bonded screed is between 25-40mm.

What is unbonded screed?

Unbonded screed, on the other hand is intentionally separated from the substrate by the use of a damp-proof membrane or polyethylene sheet. With unbonded screed, it’s crucial that the drying process isn’t rushed as if it dries too fast, the edges of the screed can warp. It’s recommended that unbonded screed thickness exceeds 50mm.

Will screed stick to concrete?

Technically no as screed is not directly applied to concrete. Screed is applied over a mechanically prepared substrate (if using bonded screed) or a membrane (if using unbonded screed) which is placed over the top of the concrete.

What is the difference between bonded and unbonded screed?

We explain the differences between bonded and unbonded screed and when you would use them below. 

When would you use bonded screed?

Typically, bonded screed is ideal for areas that will regularly endure heavy loads such as driveways and car parks.

What are the benefits of using bonded screed?

The advantages of using bonded screed include how:

Bonded screed is simpler to apply as it’s thinner than any other form of screed

As bonded screeds can be much thinner than any other form of screed, this makes the application much simpler as all that’s required is a slurry of cement and water or a bonding agent.

Reduces shrinkage

By applying bonded screed correctly, shrinkage will be reduced in the future due to additives contained in the bonding agent.

When would you use unbonded screed?

As it uses a damp proof membrane to protect against moisture, unbonded screed is best used in buildings where damp presents a serious problem (e.g. for underfloor heating).

What are the benefits of using unbonded screed?

Reasons for choosing unbonded screed include how:

Unbonded screed prevents settlement

Settlement is the term given to when a floor sinks due to large amounts of pressure. Settlement is a common problem with concrete floors, but as the damp-proof membrane separates the screed from the concrete, the risk of settlement is mitigated.

Unbonded screed reduces shrinkage cracking

Shrinkage cracking accounts for about 80% of screed cracking. By separating the screed from the concrete substrate, the risk of shrinkage is greatly reduced during the drying process.

Unbonded screed guards against damp

As already touched upon, thanks to the damp-proof membrane separating the screed from the concrete, a barrier is created to prevent damp rising from the substrate.

Which is better – bonded or unbonded screed?

We don’t believe one screed design is better than the other – it all depends on your project and how you intend to apply the screed; for projects that need to withstand heavy loads on a regular basis, we recommend opting for bonded screeds.

For projects that take place in areas that are prone to moisture and damp, we suggest choosing unbonded screed.

Whether you require bonded or unbonded screed, trust Wright Minimix to provide the right floor solution for your commercial or domestic needs.

Wright Minimix is a specialist concrete and floor screeding company

Wright Minimix specialise in supplying high quality liquid screed flooring, concrete blocks and ready mixed concrete to customers across the South West of England and South Wales. Our team of vastly experienced and skilled concrete contractors pride themselves on giving expert advice across our commercial and residential clients.

To find out how we can provide screed flooring for your property, or to learn more about our wide array of concrete services, don’t hesitate to call our friendly team today on 01179 582090 or alternatively feel free to leave a message on our contact webpage.

Read more
The Complete Guide to Concrete Pumping
25th August 2022

Before you can start pouring concrete into your lay site, you need a way to get it there.

In this guide to concrete pumping, you’ll learn exactly how the pumping process works, and why it could be the best concrete transport solution for your business.

If your mix trucks are too large to get close to your lay site, delivering concrete can prove a problem. You could transport the concrete manually, but lugging around heavy cement-filled wheelbarrows is far from ideal – it’s slow and back-breaking work, with a high risk of spillage or injury.

That’s where concrete pumps come in. Concrete pumps streamline the process of transporting concrete, delivering it faster, easier, and more cleanly. They’re able to transport hundreds of yards of mix with ease, cutting down on wastage and speeding up the process massively.

At Wright Minimix, we have a wide range of concrete pumps for hire. These include the largest concrete pump in the UK, standing at 62 metres tall, and the boomless minipump, for delivery to especially difficult-to-access lay sites. If you’re looking for the right pump for your project, get in touch!

How Concrete Pumps Work

Concrete pumps use a simple, reliable mechanism for transporting concrete.

Two cylinders are placed next to one another. Inside each cylinder is a piston: one piston draws the concrete into the cylinder, while the other pushes the concrete out. A valve can be turned to determine which cylinder is open to the concrete hopper and which is open to the discharge pipes.

When concrete is pumped, a layer of water, sand, and cement keeps it lubricated as it moves through the pump line walls. The mix needs to have enough water to move easily through without causing a blockage.

If you’re looking for the right concrete mix for your pumping project, we can help. We’ll create a high-quality custom mix for your project that moves smoothly through pipes while still serving its ultimate purpose.

Types of Concrete Pump

There are two main types of concrete pump: boom pumps and boomless pumps.

Boom pumps use a long robotic arm to deliver ready-mix concrete and liquid screed quickly and accurately. Because of the sheer volume of concrete they’re capable of pumping, they’re often used on large construction sites.

As the name suggests, boomless pumps – also known as ground line pumps – lack this robotic arm. They instead rely on laying pipes from the vehicle to the lay site. Boomless pumps are useful for smaller sites that are difficult for mixing trucks to access.

Looking for more information? Check out our blog post on choosing between boom and line pumps.

If you’re unsure which pump will work best for your project, don’t worry. Whether you need a large concrete pump or a small concrete pump, we can show you exactly which pump will work best for your project.

How the Concrete Pumping Process Works

The specifics of how pumping works depends on the individual situation. However, there is a typical process most projects follow:

  1. The pump’s operator sets up the pump and prepares the grout
  2. The concrete mixer truck backs into and connects to the pump
  3. The operator grouts the line and begins pumping
  4. If using a boom pump, the concrete will be laid using the arm. If using a boomless pump, the pipeline must be rearranged during the pouring process
  5. Once the concrete has been fully dispensed, the mixer chutes will be cleaned on site
  6. Repeat for the other mixing trucks (if necessary)
  7. Once completed, the concrete left in the pump and pipeline will be cleaned. How long this takes depends on the length of the pipeline
  8. The boom (if present) is reverted back into its travel position and all equipment is packed away. The pump is then driven back to the depot

How to Prepare Your Site for Concrete Pumps

Pumps are excellent at accessing hard-to-reach areas, but they’re more effective when they’re placed as close to the site as possible. It’s important to make sure your site has plenty of room for them and the transport vehicles they arrive in.

If your site is too small or remote to accommodate them, you should plan ahead accordingly. Make sure you’re using a pump that is long enough to reach the site. If you’re using a concrete pumping service, warn them ahead of time so they can account for the obstacle.

Using Concrete Pumps Safely

Pumps are huge pieces of equipment that, if misused, can cause serious injury or death. It’s paramount you take the correct safety precautions when setting up and operating them.

Using Concrete Pump Equipment Safely:

  1. Always check for worn couplings or gaskets, as these may let air into the line or allow grout to escape. Wear on pipelines can be checked with a gauge designed to measure the thickness of steel pipe. Make sure pipe ends are compatible with one another, as joints can be dangerous if the ends and couplings don’t match.
  2. The pipeline must be properly tied down. Space support brackets every 10 or so feet to reduce stress on the coupling joints, and to transfer the torque to a column or beam.
  3. Make sure you’re using the right hose for your application. You should use a specially reinforced hose if you’re using a boom pump. Only place hoses designated as a discharge type at point of placement for discharge.
  4. Whenever possible, use water to clean the pipes once pumping has completed. Water is safer and more effective at cleaning than compressed air.

Concrete Pump Vehicle Placement:

  1. Before you extend the boom, make sure no obstructions are in the way. For example, power lines, trees, or scaffolding.
  2. Power lines in particular pose a big risk. The metal on pumping equipment conducts electricity easily, as does the water present in the concrete mix. Coming into contact with electrified equipment will likely be fatal. If power lines cannot be entirely avoided, you should have a spotter to keep an eye on the boom at all times.
  3. Park trucks a good distance away from slopes or sharp drop offs.
  4. Make sure the truck is properly stabilised for the type of surface it’s mounted on.

If you still have questions about concrete pumps, reach out to us! We’ve worked on hundreds of pumping projects, and can give you expert advice about choosing and operating the right pump for your project.

Read more